
On this page
Scanlily can estimate the value of any inventory item by searching the live web for comparable products and weighing those listings to produce a defensible suggested value. The same feature serves insurance adjusters who need a Replacement Cost Value, estate-sale companies who need a Fair Market Value, and general-purpose inventory owners who want a quick check of what something is worth. This guide covers using the feature on the Scanlily mobile app and on the user website.
Choose your subscriber persona
Scanlily tailors its defaults to the kind of work you do. The persona screen appears during initial registration and is also reachable later from Subscriber → Subscriber Profile.
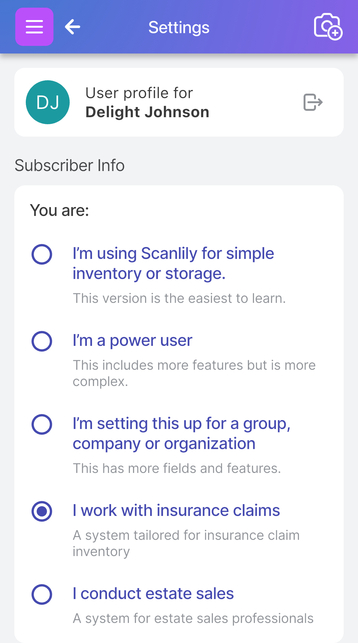
Choose I work with insurance claims if you are an adjuster, a risk manager, or an asset-inventory firm that needs Replacement Cost Value on every item. This persona puts the pricing engine in RCV mode, auto-applies the AI's top pick to the item's Cost to Replace (RCV) field, and applies adjuster-specific field labels and defaults across the rest of the app. Choose I conduct estate sales if you sell items in the resale market. This persona puts the pricing engine in FMV mode and auto-applies the AI's top pick to the item's Price field. The general personas - Simple, Power User, Group/Company - leave the pricing engine in Automatic mode, which returns whichever valuations are informative for each item.
The persona only sets defaults. You can override every setting in Pricing Settings later.
Pricing Settings - RCV, FMV, and Automatic
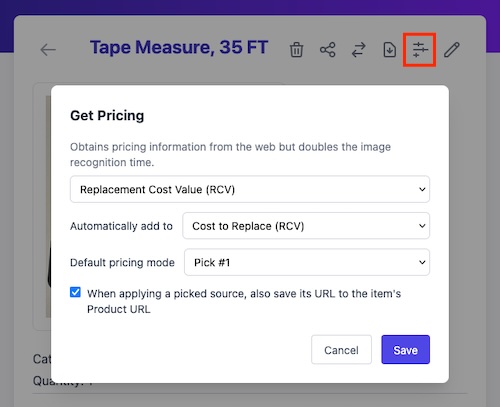
Pricing Settings live behind a gear-shaped button on the item-creation popup and on the item detail page. The same modal opens from both surfaces.
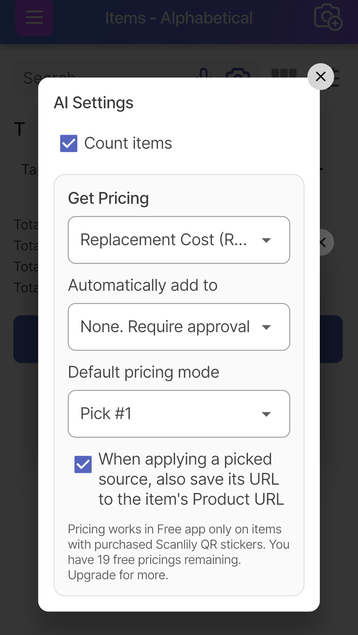
Three modes are available:
- Replacement Cost (RCV) - what it would cost to replace the item with one of like kind and quality at current retail. The AI prefers new-condition retail listings; if none exist for a discontinued item, it falls back through current substitutes, specialist dealers, and finally used-resale prices, and it tells you which tier produced the number.
- Fair Market (FMV) - the price the item is likely to realize in the used or resale market. The AI prefers used-resale and specialist-auction listings.
- Automatic (default for general personas) - the AI returns whichever valuations are informative for the item. Most general items get both RCV and FMV; rare or discontinued items often get only one.
Insurance subscribers default to Replacement Cost (RCV). Estate-sale subscribers default to Fair Market (FMV). Everyone else defaults to Automatic. You can change the mode at any time, and the next estimate run on a given item picks up the new mode.
Save URL to Product URL
The pricing settings include a checkbox: When applying a picked source, also save its URL to the item's Product URL.
Turn this on if you want every applied price to leave a defensible web reference attached to the item. For insurance adjusters this is the link an examiner can click to verify the comparable used in the claim. For online sellers it is the proof that the chosen price reflects a real listing.
For insurance subscribers the field is labeled Comparable URL rather than Product URL. The underlying data column is the same.
Auto-apply or manual review
Auto-apply controls whether Scanlily commits the AI's top pick to a price field automatically the moment an estimate finishes, or whether you have to open the Price Estimates page and apply a value by hand. The default depends on your persona - insurance and estate-sales personas come with auto-apply turned on (RCV → Cost to Replace for adjusters, FMV → Price for estate sellers). All other personas come with auto-apply set to None and require an explicit Apply step.

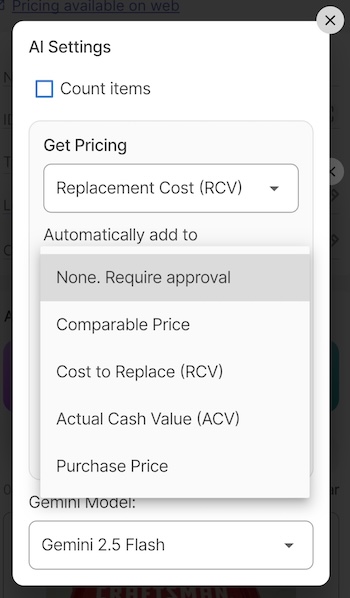
The auto-apply dropdown has two states. None means review-and-commit by hand: nothing lands on the item until you press Apply on the Price Estimates page. Selecting a field - Price, Cost, Current Value, or Original Value - means Scanlily automatically commits the AI's top pick to that field as soon as an estimate completes.
After captured items go through their AI Draft review, the adjuster or estate seller sees the price already in place on each item and only revisits the few they want to change. The persona defaults are designed to make that the path of least resistance.
Estimating prices on the mobile app
Capture the item
From the Items page, tap the Camera+ button at the bottom of the screen.

A popup appears with options for adding the item with or without a QR sticker, by image, by video, or manually.
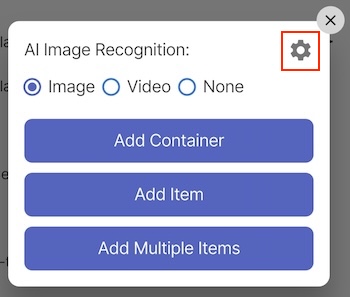
The gear icon on this popup opens the same Pricing Settings modal described above, so you can change pricing mode at the moment of capture without leaving the flow.
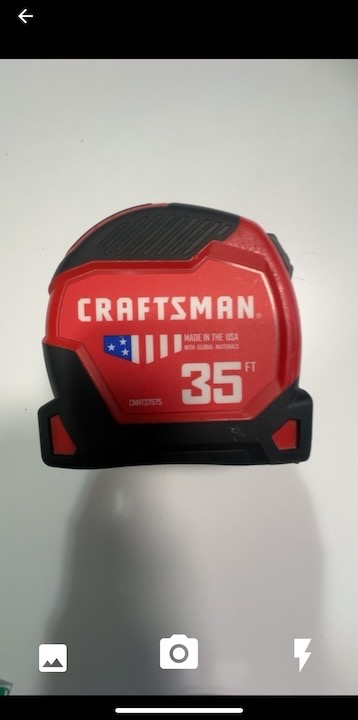
After choosing image or video, the camera opens. Capture the item - gallery, shutter, and flash controls are at the bottom of the screen - and save the draft to add it to your items list.
The estimate runs while you review the AI Draft
With auto-apply on - the default for insurance and estate-sales personas - Scanlily kicks off a price estimate the moment you save the captured draft. While the AI Draft page shows the fields the AI has filled in for review, a status banner at the bottom reads "Estimating price from the web…" and the search runs in parallel.
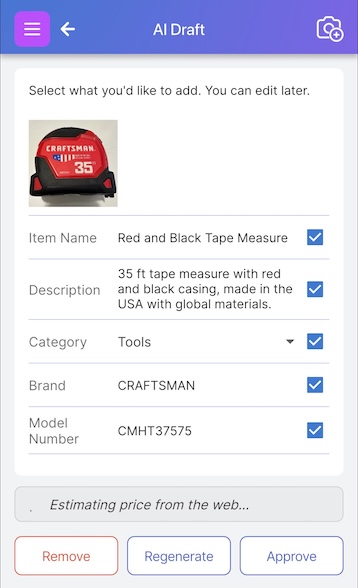
Pricing usually takes longer than reviewing the AI Draft, so you don't need wait for it. You can press Approve and move on to the next item. The estimate finishes in the background, and the AI's top pick is written to the field your persona designates the moment it does, appearing on whatever page you happen to be viewing. For insurance that field is Cost to Replace (RCV); for estate sales, Price; for any other subscriber with auto-apply set, the field they chose. If Save URL to Product URL is on, the source listing's URL is attached at the same time.
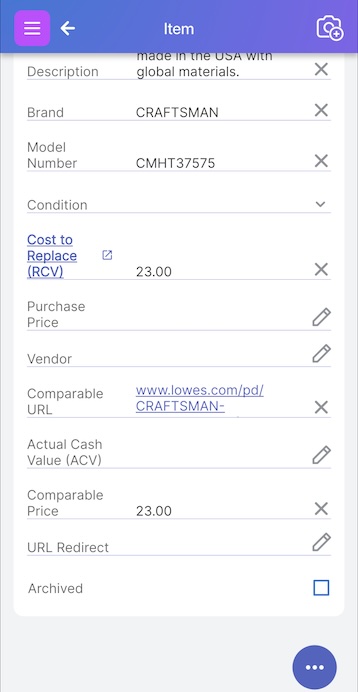
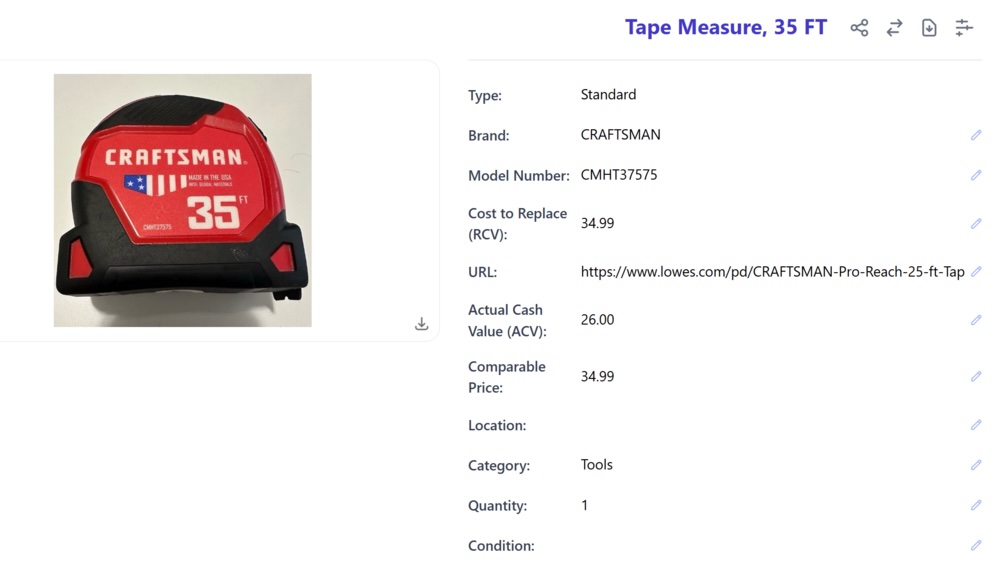
For insurance subscribers, the same item shows insurance-specific labels including Cost to Replace (RCV), Actual Cash Value, Comparable Price, and Comparable URL.
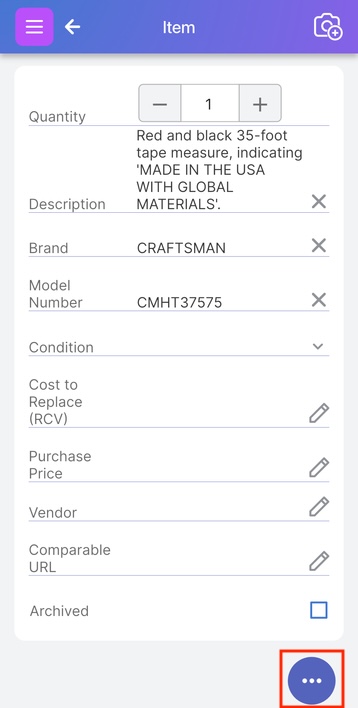
Reviewing or overriding the AI's pick
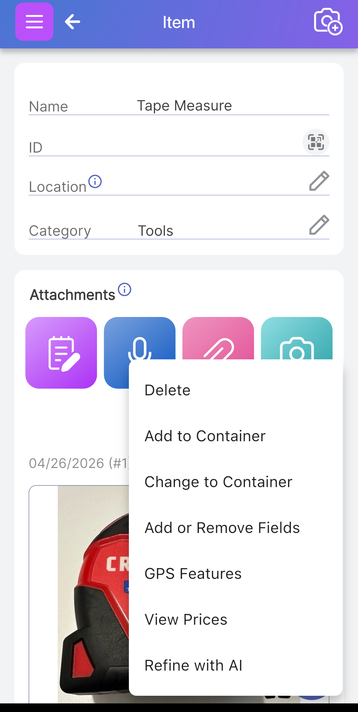
Most items end at the previous step - the AI's top pick is right and there's nothing left to do. When you do want to inspect the sources or change which value got committed, open the item and tap the three-dot menu in the bottom right. With an estimate already cached, the menu shows View Prices.
View Prices opens the Price Estimates page with the cached results from the auto-mode run. No new search runs.
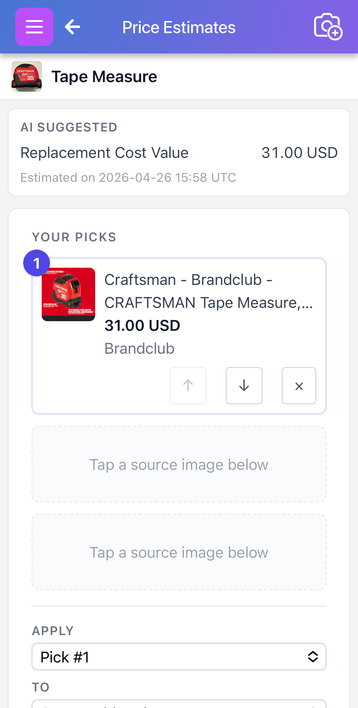
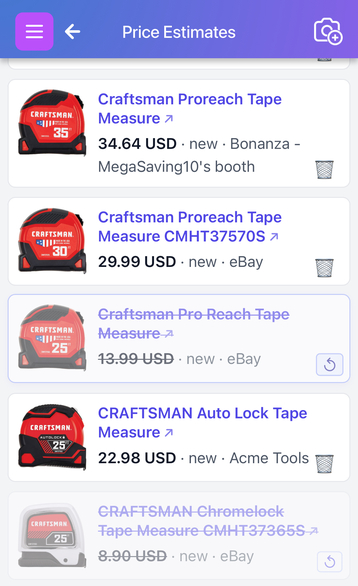
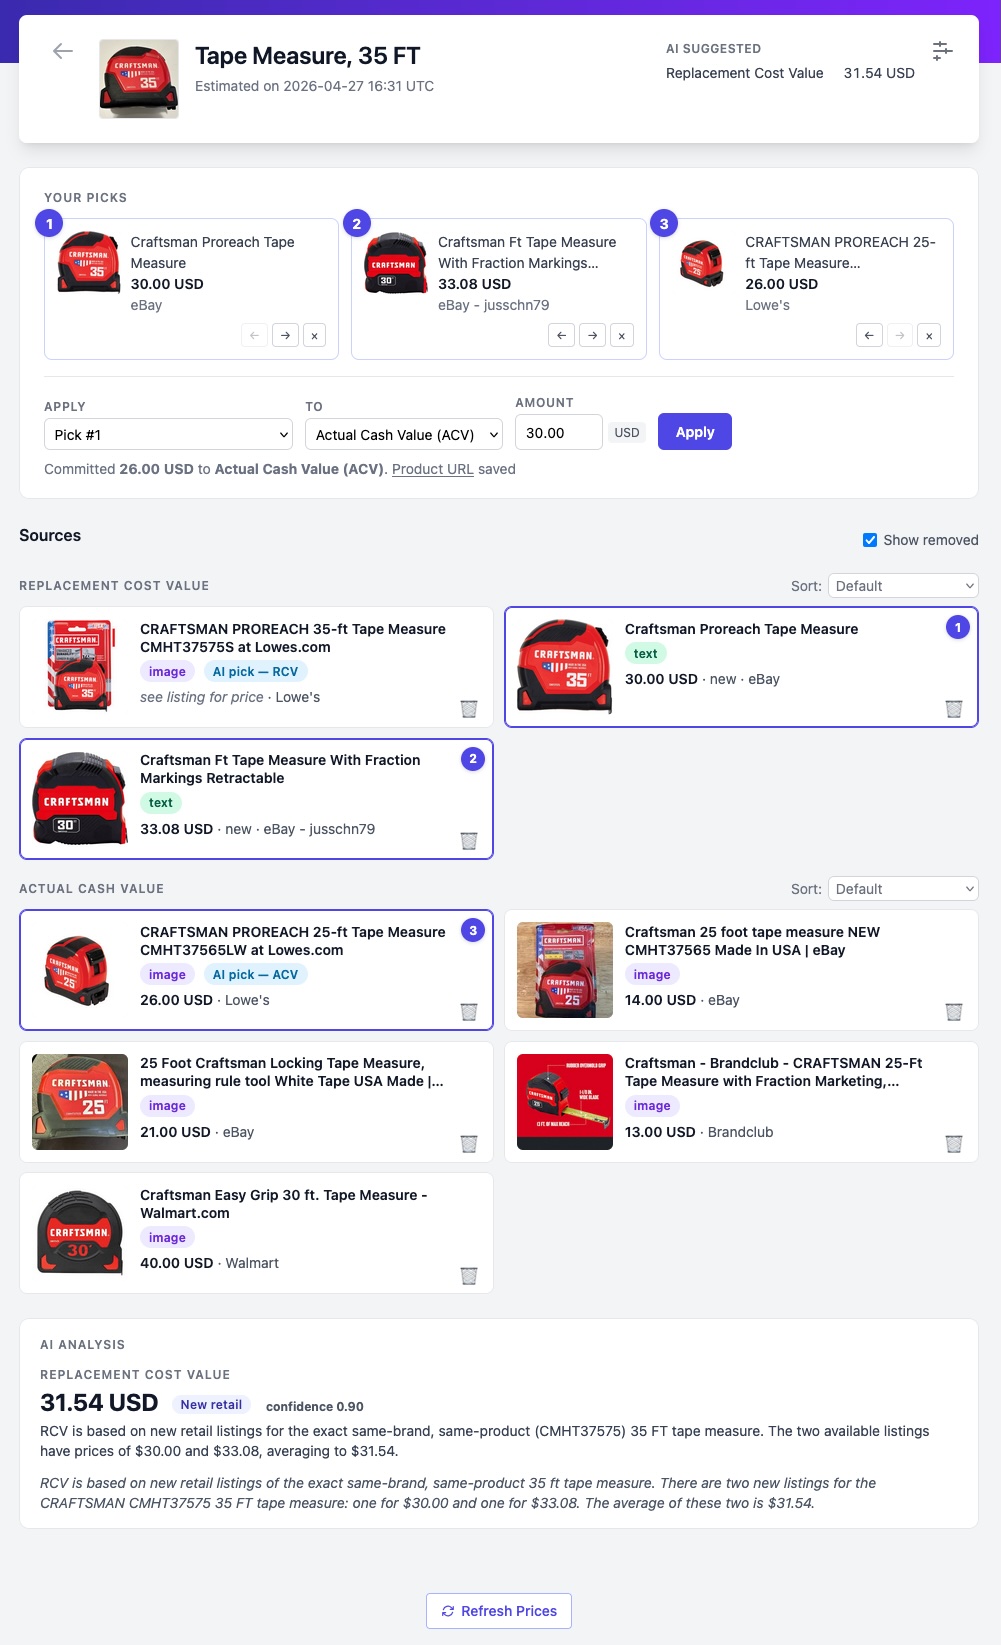
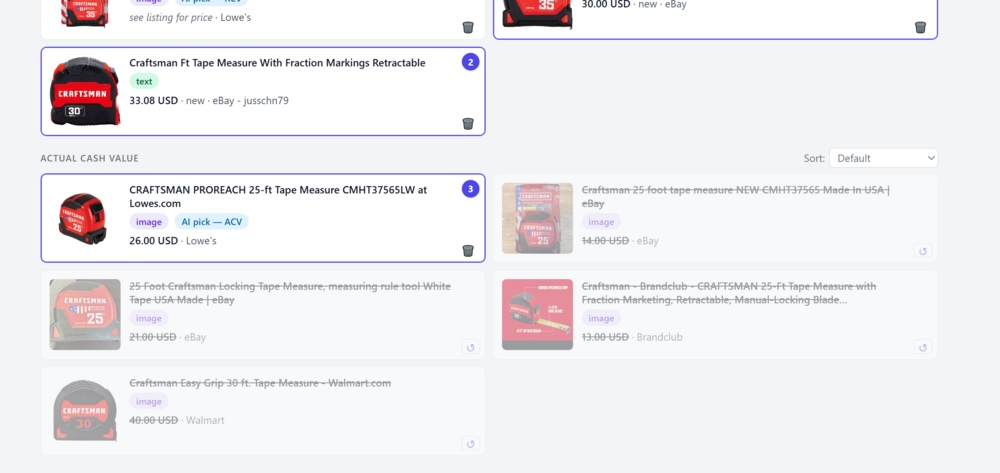
The top of the page is the AI's suggested value with a confidence indicator and a one-line explanation. Below it are tabs that group sources by valuation. In Automatic mode you see two tabs - typically Replacement Cost Value and Fair Market Value. RCV-only and FMV-only modes show a single ungrouped list. Insurance subscribers see the RCV tab labeled Cost to Replace (RCV) and the FMV tab labeled Actual Cash Value (ACV), matching the field names on the rest of their adjuster surfaces.
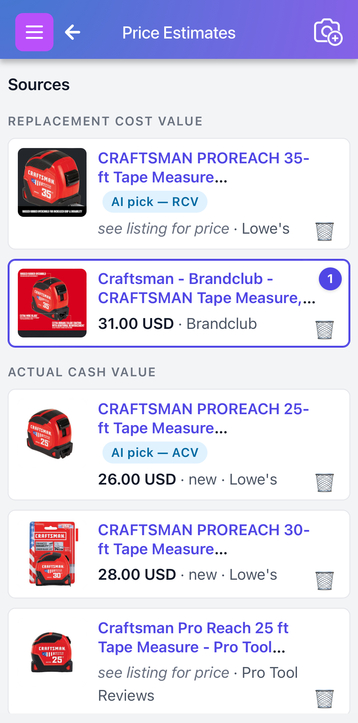
Each source card shows a thumbnail, a price in the item's currency, the merchant name, the listing condition, and a small chip indicating whether the source came from the image search, the text search, or both. The AI's top pick in each group carries a small AI pick chip.
Removing sources you don't trust
Tap the trash icon on any source card to strike it through. Struck-out sources stay visible - useful for record-keeping - but they no longer count toward the AI's suggestion or any of the average-based commit modes.
Tap the same source again to restore it. Use this to remove obvious mismatches: a different brand, a wholesale lot listing when you only have one item, a refurbished card when you need new-condition pricing.
Applying a different value or a different field
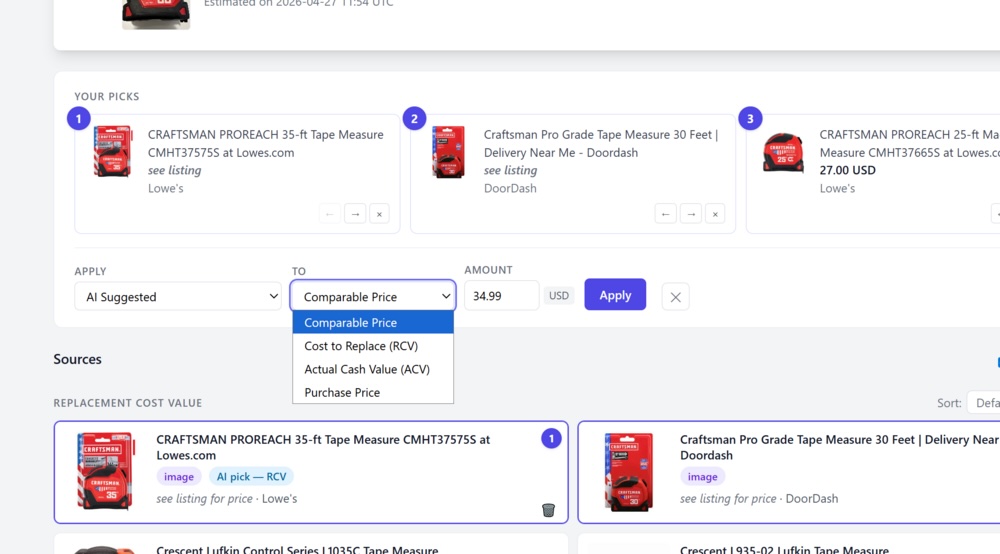
To override the AI's pick - say, to commit Pick #2 instead, average the top three picks, or write the value to a different field - use the Apply / To dropdowns above the sources.
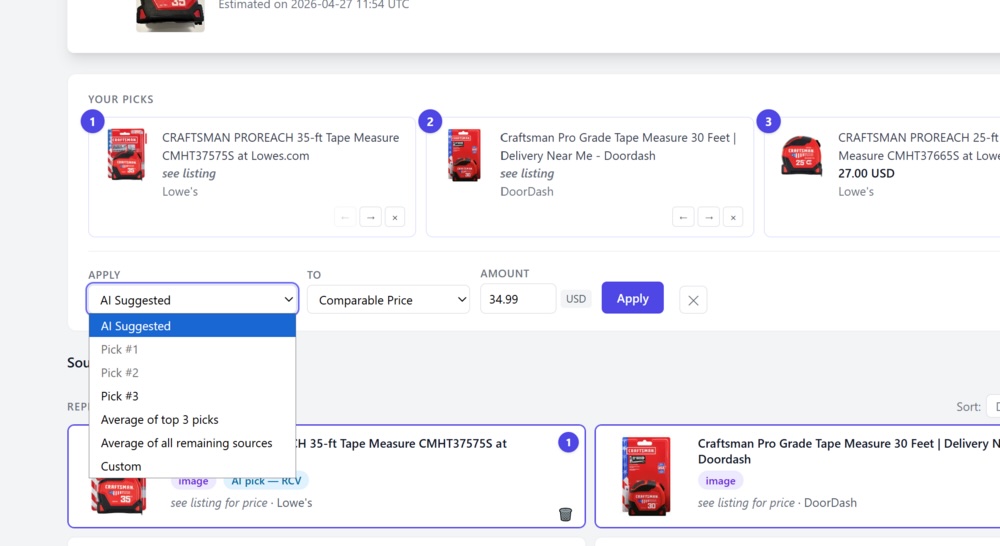
The Apply dropdown chooses which value to commit:
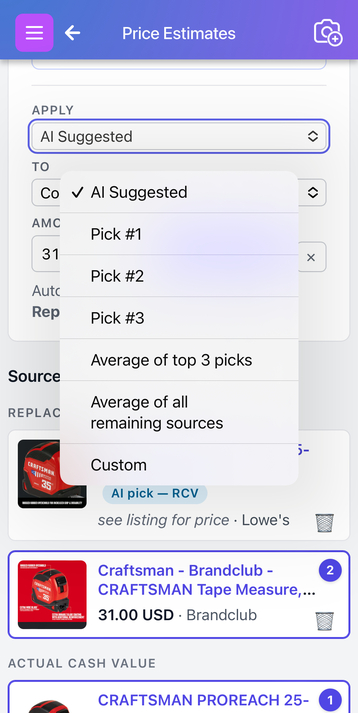
- AI suggested - the AI's headline value for the active valuation.
- Pick #1, #2, #3 - the price of a specific picked source. Tap a source card to fill the next available pick slot at the top of the page.
- Average of top 3 picks - arithmetic mean of the prices in your filled pick slots.
- Average of all remaining sources - mean of every source that is not struck out.
- Custom… - type any value directly into the amount field.
The To dropdown chooses which item field receives the value:
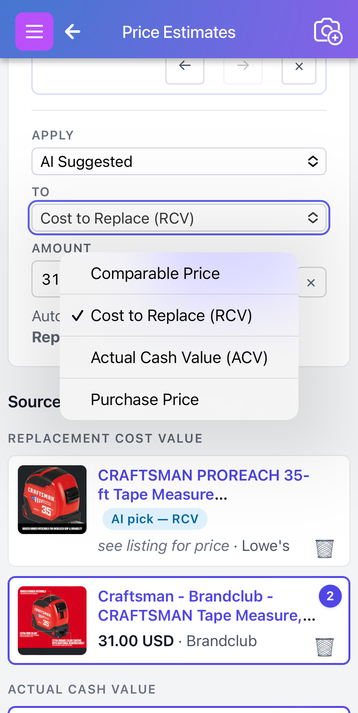
For general subscribers the choices are Price, Cost, Current Value, and Original Value. Insurance subscribers see the same fields with adjuster-friendly labels - see the field-label table at the end of this guide.
Press Apply to write the chosen value to the chosen field. If you have Save URL to Product URL enabled and you committed a Pick (not an average or custom), the source's URL replaces whatever was previously in the Product URL or Comparable URL field.
Manual mode - Get Prices
If your persona's default is None (Simple, Power User, Group/Company), or if you have explicitly switched auto-apply off in Pricing Settings, the estimate does not run on item creation. Instead, the three-dot menu shows Get Prices:
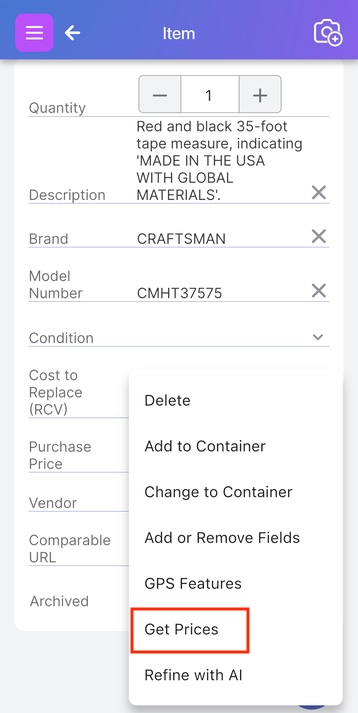
Tap Get Prices to start the estimate. The same Price Estimates page described above opens once the search completes, and you commit a value with the Apply / To dropdowns by hand.
For Pro and Business subscribers, Get Prices disappears from the menu for thirty days after a successful estimate on an unchanged item, leaving only View Prices. Editing the item or changing your pricing mode brings Get Prices back immediately.
Estimating prices on the web
The web flow mirrors the mobile flow. The Pricing Settings modal, the Apply / To dropdowns, the trash-to-strike behavior, and the auto-apply rules are identical.
From the My Items hub
Open My Items from the top navigation on the user website. The hub page offers several ways to view and edit your inventory.

Two paths reach the pricing controls. App View is a web rendering of the mobile app's item list and detail pages - the closest match to the flow described above. Inventory View is a browsable, shareable layout that doubles as the public-facing inventory. Both paths surface a Get Prices button on each item's detail page.
From the Inventory View
Click Open Inventory View on the hub. Items render as cards with thumbnails, descriptions, and any prices already on the item. Filters along the top let you narrow by category, location, aisle, customer, and more.
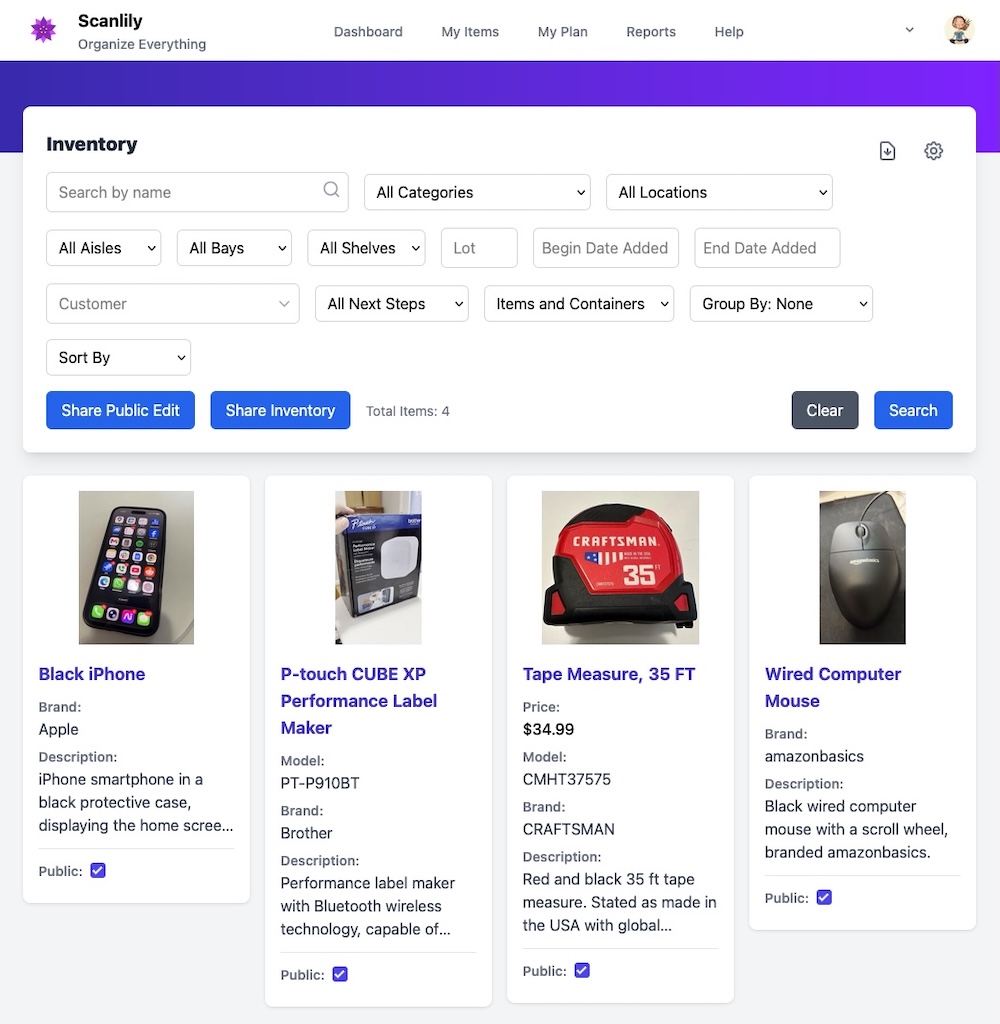
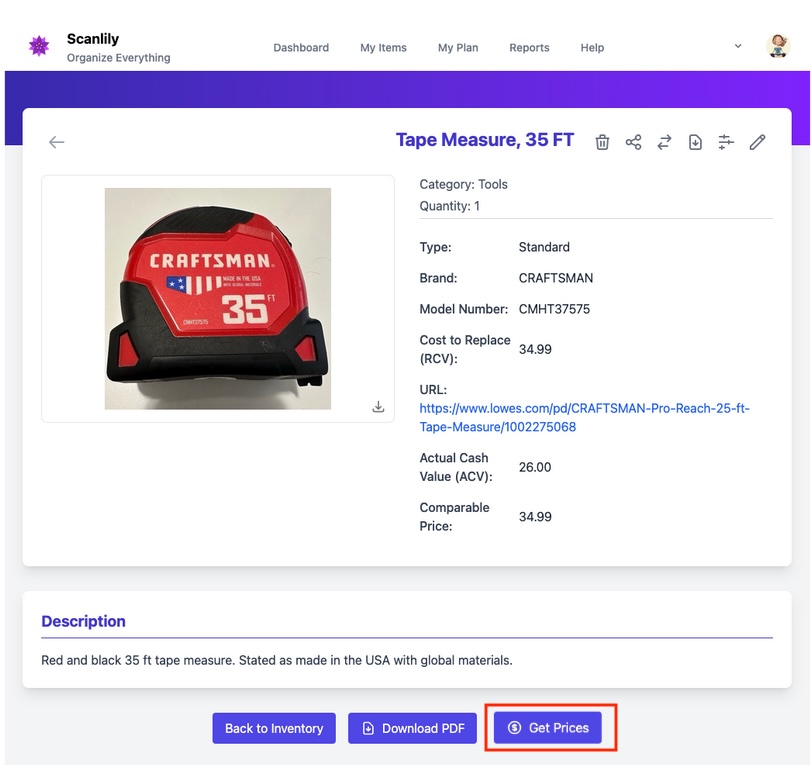
Click any card to open the item detail. The detail page carries the insurance fields - Cost to Replace (RCV), Actual Cash Value (ACV), Comparable Price, URL - and a Get Prices button at the bottom.
The Price Estimates page on the web
Get Prices opens the same Price Estimates results page used on mobile, laid out for a wider screen. The page combines the AI summary, your three pick slots, the Apply / To / Amount commit row, the source grid grouped by valuation, and a per-source AI analysis panel - all on a single scroll.
The Apply dropdown carries the same options as on mobile:
The To dropdown selects the destination field, with insurance labels for adjuster subscribers:
The trash button on each source card excludes that source from averages and from the AI's top pick:
After auto-apply
If you turned on auto-apply, the item fields are filled in the moment the estimate finishes. The Comparable URL or Product URL field becomes a hyperlink to the source listing, and the chosen valuation is written to the field you selected - typically Cost to Replace (RCV) for insurance subscribers.
Reports for insurance claims
Business subscribers can run a Claims Report against any selection of items. Open Reports from the user website navigation.
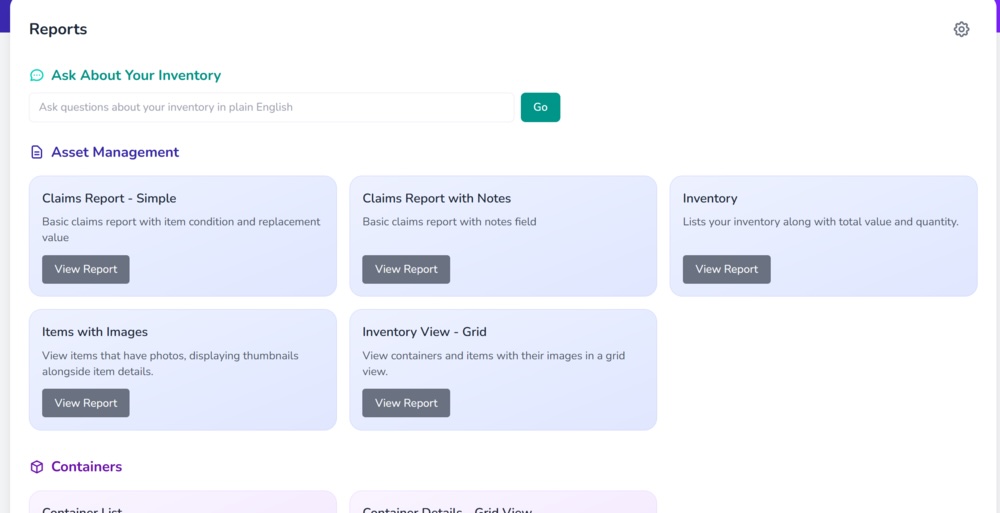
The Claims Report includes the Replacement Cost Value, the Comparable URL, and the rest of the insurance fields for each item, suitable for attaching to a claim.
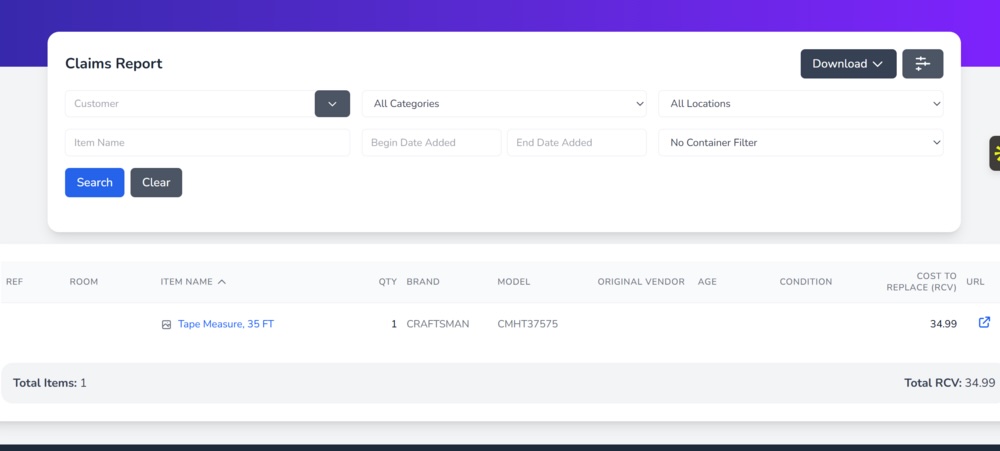
Reports can be downloaded as PDF, CSV, or Excel for delivery to a carrier or examiner.
Subscription tier and quota limits
Pricing is available on every tier, with limits that depend on the subscription level and on whether the item carries a purchased Scanlily QR sticker.
- Pro and Business subscribers - unlimited estimates. Each item can be re-priced once every thirty days; an item that you edit, or whose pricing mode you change, becomes immediately re-priceable.
- Free subscribers with a purchased Scanlily QR sticker on the item - one estimate per stickered item, ever. Use View Prices afterward to revisit the result; the run does not count against any quota.
- Free subscribers without a sticker - bounded by a subscriber-level quota of twenty estimates by default. After exhaustion, cached estimates remain viewable but new runs are blocked until you add a sticker or upgrade.
The repricing window and quota apply only to the underlying search; opening View Prices to inspect or re-commit values from a cached estimate is always free.
Field labels for insurance subscribers
If your subscription is on the Scanlily for Insurance product, Scanlily renames several item fields to match the vocabulary a claims process expects. The underlying data columns are unchanged; only the displayed labels differ.
| Default label | Insurance label |
|---|---|
| Cost | Cost to Replace (RCV) |
| Current Value | Actual Cash Value (ACV) |
| Original Value | Purchase Price |
| Price | Comparable Price |
| Product URL | Comparable URL |
These renames are automatic for insurance subscribers and apply everywhere a field appears: the item detail page, the Price Estimates page, the Apply and To dropdowns, exports, and the Claims Report. No setting controls them, and they never appear for any other subscriber type.