
On this page
There are different methods and strategies to add content to Scanlily and your use case will inform which might be the best approach:
a. Organizing items in boxes and containers
It's often best to start with creating a container before adding items. This helps organize your items in the system - particularly if you will have many. A container should best represent something in the physical world like a box, shelf, or space where your items reside. But it can also be conceptual. Here are the steps:
1a. Scan the QR label
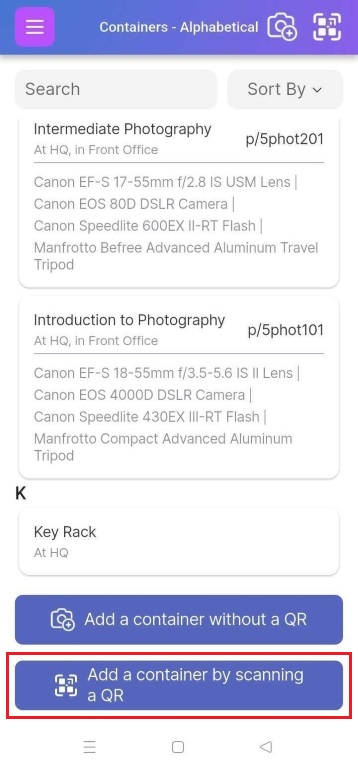
Click on the upper right QR button from any page, or navigate to "My Containers" from the upper left menu and then from the bottom select the "Add a container by scanning a QR" button. Then Scan the QR label.
OR
1b. If you are not using a QR label for your container, select the Camera+ image, or navigate to "My Containers" from the upper left menu and then from the bottom, select the "Add a container without QR" button.

2. Select Options for Adding Item(s)
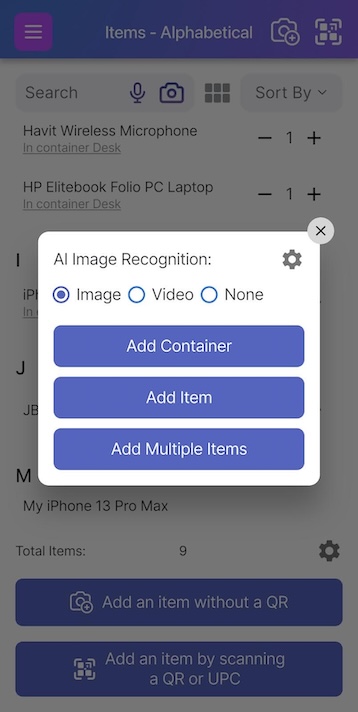
Irrespective of the steps you take, in the popup, you can choose the scanning mode for Scanlily’s "AI image Recognition". On Image, you can take a photo of your item and the AI will scan it and catalog it in your items list including the product name, brand, type, color, and other attributes.
On Video, you can take a video of items you want to add to a Scanlily container and in a physical container or shelf, and the AI will create separate entries for each item recorded in the video and group them into a container - you can edit the AI drafts at any time.
Or you can click None to disable the AI Image Recognition all together if you want to fill in the container manually.
Select "Add Container" to create a new container into which you can then add items. Next, click on ‘Add container with Items’. Alternatively, if the button appears based on your access and product level, select "Create a container and add items from one image". This latter approach will allow AI to both create the container from an image and based on what it sees inside the container, to also add the individual items

3. Add items to the container
Once you have created the container, head to My Containers to see the container, then click on the Container to access its contents. Under the "Add items to container" tab, click:
a. "Without QR" - Creates new items directly inside this container.
Use this when you want to add items that don't exist in your system yet and they don't have QR stickers on them. Depending on access level, you can enable the ‘AI Image Recognition’ mode to add one item by clicking ‘Add Item’ or multiple items by clicking ‘Add Multiple Items’ by snapping an image or recording a video of your items.
b."Search" - Finds and adds existing items from your inventory to this container.
Use this when you've already created items elsewhere and want to organize them into this container.
c. "Scan" - Scans a code to add items to this container.
What happens depends on the type of code:
-
- Scanlily QR codes: Creates a new item if the QR hasn't been used, or adds the existing item tied to that QR sticker if it's already in your system
- UPC codes (Business customers only): Creates a new item with product information pulled from the UPC database, or adds the existing item if that UPC is already in your system
- Proprietary barcodes: Adds an existing item that already has this barcode in its ID field (cannot create new items with proprietary barcodes from this screen)

b. Add individual items not in containers
You can add items to your Scanlly account without placing them in containers. At any point, you can add the item to a container if you need:
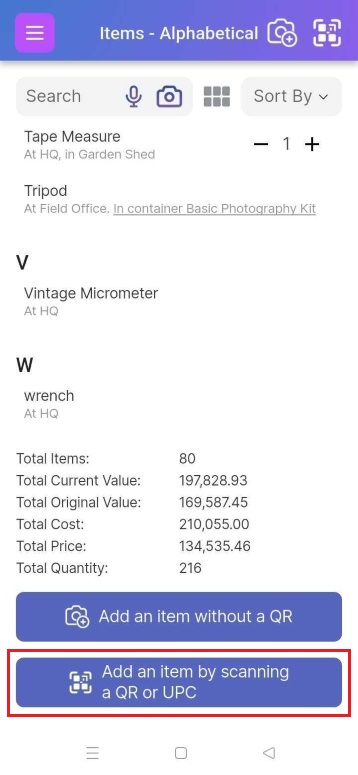
1a. You can add items to Scanlily while waiting for your QR stickers by clicking the Camera+ image, or navigating to My Items from the upper left menu and then from the bottom, select "Add an item without QR".

-
OR
1b. If you have your Scanlily stickers on hand already, click on the upper right QR button from any page, or navigate to My Items from the upper left menu and then from the bottom select "Add an item by scanning a QR or UPC" button.
2. In the popup, keep "AI image Recognition" checked to Image or Video if you would like AI to recognize the items and create item entries (with full descriptions) automatically; otherwise, uncheck it. Select "Add Item" or ‘Add Multiple Items’ depending on the number of items you want to add.
You can then click ‘Add Items’ to simply add the items or ‘Add Items to Existing Container’ if you want to add them to a container.
Alternatively, if the button appears based on your access and product level, select "Add multiple items from same image". This latter approach will add multiple items at once. While you can use Image mode to add multiple items, the Video mode is more effective with a large number of items or unique items because the recorder will listen to your voice for descriptions of your items. However, to aid in organizing items, it is often better to first create a container and then add the items to it (see above).
Follow the steps to add with AI Image Recognition as explained in this section.
You can always change your item to a container.
In order to do so, click on the bottom right menu button and select “Change to Container.” You can now store other Item pages linked to your new Container page.

Then proceed to add items as in 4b4 above.
c. Import from a spreadsheet or JSON File.
See the section on Data Import to learn more about this.