If your business manages inventory on behalf of clients - whether you’re an estate sale company, insurance adjuster, professional organizer, or IT service provider - keeping each customer’s items organized and separate is essential. Scanlily’s Customer system lets you tag every item to the client it belongs to, filter your entire inventory by customer with a single tap, and navigate each customer’s locations independently.
Customers are managed in two places: quickly from the mobile app for on-the-go work, and in full detail from the User Website for back-office administration. This post walks through both.
Managing customers from the mobile app
The fastest way to work with customers is directly from the Scanlily app’s item list. The Customer dropdown in the filter bar lets you select a customer, create a new one, and navigate their locations - all without leaving the inventory screen.
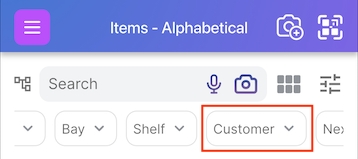
Filtering items by customer
From your item list or container list, tap the Customer dropdown in the filter bar:
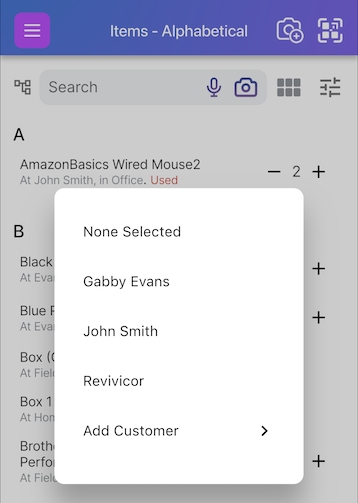
The dropdown shows all your customers. Select one to filter the item list to only that customer’s items:
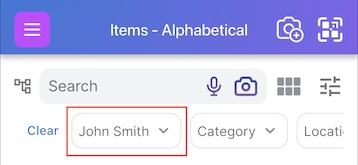
Once selected, the customer stays set as you move around the app — browsing items, scanning QR codes, or adding new inventory. Everything you see and create is scoped to that customer until you clear the filter:
Creating a customer from the app
Notice the Add Customer option at the bottom of the customer dropdown. Tapping it lets you create a new customer right from the item list - enter the customer name and a single address, and you’re ready to start adding their items immediately. This is designed for speed in the field: you arrive at a new client’s site, create the customer, and begin cataloging without switching to a different screen.
Creating a customer this way gives them one address. If the customer has multiple properties or locations, you can add more addresses later from the User Website (covered below).
Navigating a customer’s locations
With a customer selected, tapping the Navigate button opens the navigation panel scoped to that customer’s addresses and locations:

You’ll only see their addresses, their locations, and their items. The full drill-down hierarchy works exactly as it does for your own inventory:
Address ➤ Location ➤ Aisle ➤ Bay ➤ Shelf ➤ Container ➤ Item
however, it is filtered to that one customer. Items you add while navigating within a customer’s location automatically inherit both the customer and the location.
This makes it straightforward to catalog an entire client site: select the customer, navigate to the right room or shelf, and start scanning or photographing items. Every item lands in the correct place with the correct customer assignment.
Managing customers from the User Website
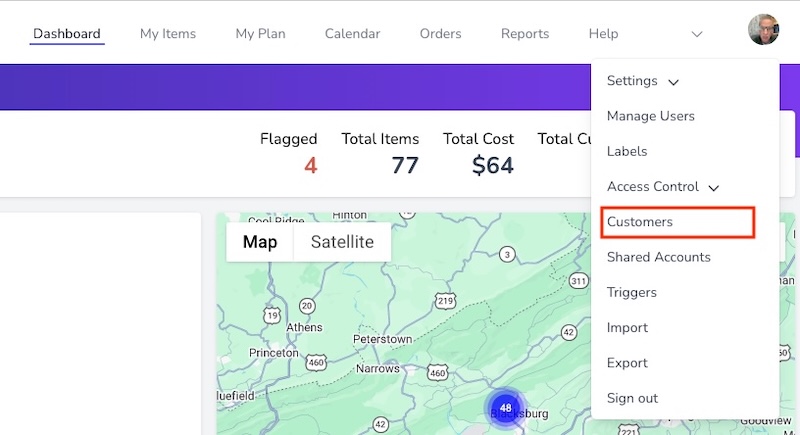
While the mobile app is built for quick customer creation and on-site work, the User Website is where you manage the full details of each customer. To access customer management, log in to the Scanlily User Website, click the profile menu at the top right, and select Customers:
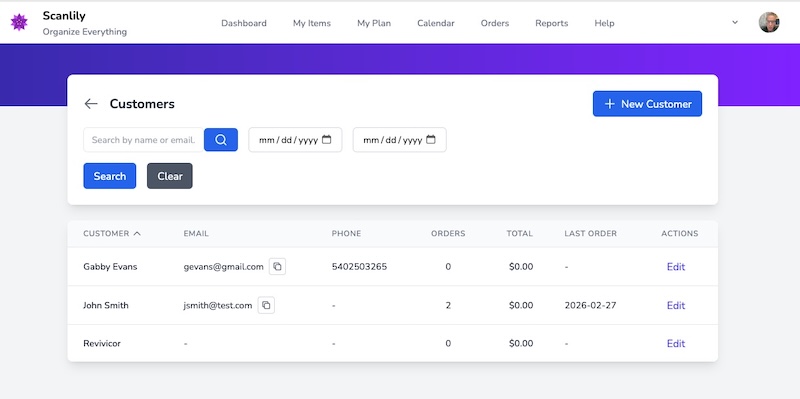
The customer list
The Customers page shows all your customers in a searchable, sortable table with their name, email, phone, order count, order total, last order date, and an Edit link. You can search by name or email and filter by date range. Click + New Customer to add one, or Edit to update an existing customer’s details.
Customer details
Clicking Edit on a customer opens their full detail page. Here you can manage all the information that the mobile app’s quick-create flow doesn’t cover:

- Account Name — The customer’s display name throughout Scanlily
- Contact Person — First name, last name, email, and phone for the primary contact
- Organization — The company or organization name
- Customer ID — Your own internal identifier for this customer
- Notes — Free-text notes visible only to your team
- Billing Address — Full street address with city, state, postal code, and country
- Shipping Address — Separate shipping address, or check “Same as billing”
- Archived — Toggle to hide inactive customers from lists without deleting them
Inventory addresses, claims, and order history
Below the contact and address details, the customer page shows three additional sections:

- Inventory Addresses — These are the locations where this customer’s items are stored or managed. They appear as selectable addresses when you assign items to this customer in the app. Click + Add Address to add more locations beyond the single address created from the mobile app.
- Claims — For insurance adjusters and similar use cases, attach claim records to a customer with claim number, policy number, insurance company, insured name, dates of loss and inspection, and the property address. Click + Add Claim to create a new claim.
- Order History — A record of all orders placed for this customer, with dates, totals, and status.
A workflow example: estate sale company
Here’s how the pieces fit together for a typical estate sale engagement:
- Create the customer from your phone — When you arrive at the client’s home, open the Customer dropdown and tap Add Customer. Enter their name and the property address. You’re ready to start in seconds.
- Catalog the inventory on-site — With the customer selected, use Navigate to drill down room by room. Scan QR stickers or take photos and videos — the AI creates items tagged to the right customer and location automatically.
- Fill in customer details later — Back at the office, open the User Website and edit the customer. Add their contact information, billing address, and any notes about the engagement.
- Add more addresses if needed — If the client has items stored at a second property or storage unit, add the address from the Inventory Addresses section. Next time you’re on-site at that location, it’s ready to use in the app.
Who uses customer management?
The Customer feature is available to Scanlily Business subscribers. It’s designed for any business that manages inventory on behalf of others:
- Estate sale companies — Catalog each client’s household separately, then price and sell from organized, per-customer inventory
- Insurance adjusters — Document claims per policyholder with attached claim records, addresses, and full item inventories
- Professional organizers — Track each client’s belongings across their home, storage, or multiple properties
- IT service providers — Manage equipment inventories for multiple client companies, each with their own locations
- Senior move managers — Inventory a client’s home, then track items through the move to the new location
Get started
Customer management is built into every Scanlily Business subscription. Open the Customer dropdown in the app to create your first customer, or visit the User Website to manage customer details.
Combine it with Navigate for per-customer location drill-down, Web Upload for bulk cataloging with customer defaults, and Reports to generate per-customer inventory reports.